
How to Setup a Raspberry Pi Cluster
Table of Contents
INTRODUCTION
As a long-time computer programmer and almost as long a High-Performance Computer (HPC) user, I didn’t know anything about how these machines worked under the hood. I still really don’t, so a few years ago when I was working at one of the US National Labs, I decided that a fun project to learn this would be to build my Raspberry Pi cluster. Well, life got in the way and I started getting parts for it and never got around to doing it.
Last year, my employer spent millions of dollars on a whole new set of HPCs, and up to now, we’ve not gotten the bang for the buck we had anticipated because to get them up in the hands of the working engineers, we broke some of them apart into their constituent pieces and mimicked the machines we already had on hand. This is all well and good, but we have machines with 2000 nodes that we would like to set up and use on CFD (computational fluid dynamics) problems as well as large 3-D MoM CEM (method of moments computational electromagnetics) which I am using to running on 500 node machines for a month or more before getting the answer.
Push came to shove and I decided that my home life was at the point where I could spend quite a bit of my time finally setting up a Raspberry Pi cluster. So, it would force me to learn all of what goes on under the hood when setting up these machines and I could actually learn to program using MPI (message passing interface) and ultimately use Slurm (https://slurm.schedmd.com/). My other ulterior motive was to bust a hump and get a cluster working with Slurm before the IT guys at work got them running because I’d been hearing them complain about how hard it was to set up Slurm and get it running since they had never done that before.
PARTS LIST
The first thing I needed to do was to figure out what I needed to get this done. A couple of years ago I bought a case to mount the Raspberry Pi’s in. That was sitting on my desk waiting patiently and collecting dust. I had finally bought a Raspberry Pi 4 B+ starters kit for myself at Christmas time (I wrapped it up and put it under the tree and when my kids were passing out the presents, they said, “Dad, this is for you and it doesn’t say who it is from…”, they aren’t dumb, but it took a minute for them to come to the realization that Santa, i.e. dad when shopping for himself). I followed the directions and had it up and running in about half an hour and it was just sitting there, running and not doing anything but acting like a web browser for my tai-chi videos on YouTube.
I got onto Amazon and set up my order, two more Raspberry Pi 4 B+, a set of Ethernet cables, and power supplies. 32 GByte micro-sd cards and a small SSD-external drive to act as a storage unit. I figured I was on my way. Alright, DrT, don’t get cocky, you aren’t anywhere close to getting it set up and running, so patience grasshopper, patience.
After I get my order, I go and get a small power strip to plug in the Raspberry Pi’s and the Ethernet hub I already had on hand for this project. I get back from the hardware store pull out the power supplies and realize that I can only plug three things into the 6-plug strip because of the size of the case attached to the pi power supply. My house is almost 100 years old, so my office is severely limited in wall plugs. Plan B, get back on Amazon and order a power over ethernet (PoE) network hub and PoE hats for the pi’s themselves. This meant pulling the case I already assembled and installed the pi’s into because the fans on the hat would interfere with the fans in the case. Since I work long hours at work, we work 4-10 and I don’t get home until about 7:30 in the evening by the time I eat dinner and walk the dogs, I’m ready to go to bed and I don’t want to get frustrated with the cluster late at night. Not to mention, it’s NHL playoff time and I want to watch the fights to see if a hockey game breaks out. (Ok, I’m old, hockey isn’t nearly as fight-driven as it used to be.)
CONFIGURATION: PART 1
So my parts come in the mail and I’m getting ready to start playing again. I get the hats installed and the boards back into the case all pretty. I go to plug in the monitor cable and it is an HDMI and my monitor has a display port, so that isn’t going to work. I go searching through my house for an HDMI-compatible monitor. so that delays me a little, but I find one sitting in the corner of the basement with all the other assorted computer parts. Back in business. I flash the SSD cards with Raspian and make a file called SSH in the boot partition so I can get SSH into the node when I get it on the network. So I get the first one up and running and repeat with the other cards and Raspberry Pi’s.
I’ve already read about 50 websites over the past month or so on how to set up a Pi cluster. No two are exactly alike, so pick the one you like the best based on aesthetics because that is as good a reason as any, you’re going to have issues anyway, so it might as well be a nice-looking site that gives you fits. For example, one might say use the raspi-config utility to set everything up and another might say use the command line and type these commands. They are all about the same, so get used to doing it, because you have to do the same setup for each one of the boards, one at a time. Maybe getting one set up and then cloning the card might have been a better idea, the setup would have been faster since you only need to change the machine name. As I’m getting this going, I decided that I’m going to use my existing Linux workstation as the head node and have a 4-node cluster as opposed to a 3-node cluster. This adds some headaches as you will see later.
I note the IP address because this is important. That is one of the only common threads on all of these websites. On my home workstation, I generate an SSH key to set up getting into the different nodes to do maintenance and updates without having to type in my password every time I try to log in. I type in:
$ ssh-keygen -t rsa
$ ssh-copy-id -i ~/.ssh/id_rsa.pub pi@192.168.1.173
and repeat the second command for each pi-node in my cluster substituting the IP address for the new board. Now I can ssh into each node. We’re off to the races and I install mpi on each of the machines by typing:
$ sudo apt-get mpi
That works and I check the version using
$ mpiexec --version
Everything is good. when I run a mpi exec command on the individual nodes which works flawlessly. To check that mpi is running correctly on the entire cluster, I generate a file nodes.ips containing the IP addresses for each of the nodes. I then run the command
$ mpiexec -f nodes.ips -n 4 hostname
and I get
$debian01
$debian01
$debian01
$debian01
ORTE does not know how to route a message to the specified daemon
located on the indicated node:
my node: 192.168.1.4
target node: 192.168.1.173
This is usually an internal programming error that should be
reported to the developers. In the meantime, a workaround may
be to set the MCA param routed=direct on the command line or
in your environment. We apologize for the problem.
Curses foiled again. I went back to the internet to solve this problem and it was a bug in mpi version 3.1.x and not fixed until version 3.3. I uninstall mpi via Synaptic and install mpich using
$ sudo apt-get install mpich
$ mpiexec --version
getting
HYDRA build details:
Version: 3.3
Release Date: Wed Nov 21 11:32:40 CST 2018
CC: gcc -Wl,-z,relro
CXX: g++ -Wl,-z,relro
F77: f77 -Wl,-z,relro
F90: f95 -Wl,-z,relro
Configure options: '--disable-option-checking' '--prefix=/usr'
'--build=x86_64-linux-gnu' '--includedir=${prefix}/include'
'--mandir=${prefix}/share/man' '--infodir=${prefix}/share/info' '--sysconfdir=/etc'
'--localstatedir=/var' '--disable-silent-rules'
'--libdir=${prefix}/lib/x86_64-linux-gnu'
'--libexecdir=${prefix}/lib/x86_64-linux-gnu' '--disable-maintainer-mode'
'--disable-dependency-tracking' '--with-libfabric' '--enable-shared'
'--enable-fortran=all' '--disable-rpath' '--disable-wrapper-rpath'
'--sysconfdir=/etc/mpich' '--libdir=/usr/lib/x86_64-linux-gnu'
'--includedir=/usr/include/x86_64-linux-gnu/mpich' '--docdir=/usr/share/doc/mpich'
'CPPFLAGS= -Wdate-time -D_FORTIFY_SOURCE=2 -I/build/mpich-3.3/src/mpl/include
-I/build/mpich-3.3/src/mpl/include -I/build/mpich-3.3/src/openpa/src
-I/build/mpich-3.3/src/openpa/src -D_REENTRANT
-I/build/mpich-3.3/src/mpi/romio/include' 'CFLAGS= -g -O2
-fdebug-prefix-map=/build/mpich-3.3=. -fstack-protector-strong -Wformat
-Werror=format-security -O2' 'CXXFLAGS= -g -O2
-fdebug-prefix-map=/build/mpich-3.3=. -fstack-protector-strong -Wformat
-Werror=format-security -O2' 'FFLAGS= -g -O2 -fdebug-prefix-map=/build/mpich-3.3=.
-fstack-protector-strong -O2' 'FCFLAGS= -g -O2
-fdebug-prefix-map=/build/mpich-3.3=. -fstack-protector-strong -O2'
'build_alias=x86_64-linux-gnu' 'MPICHLIB_CFLAGS=-g -O2
-fdebug-prefix-map=/build/mpich-3.3=. -fstack-protector-strong -Wformat
-Werror=format-security' 'MPICHLIB_CPPFLAGS=-Wdate-time -D_FORTIFY_SOURCE=2'
'MPICHLIB_CXXFLAGS=-g -O2 -fdebug-prefix-map=/build/mpich-3.3=.
-fstack-protector-strong -Wformat -Werror=format-security' 'MPICHLIB_FFLAGS=-g -O2
-fdebug-prefix-map=/build/mpich-3.3=. -fstack-protector-strong'
'MPICHLIB_FCFLAGS=-g -O2 -fdebug-prefix-map=/build/mpich-3.3=.
-fstack-protector-strong' 'LDFLAGS=-Wl,-z,relro' 'FC=f95' 'F77=f77'
'MPILIBNAME=mpich' '--cache-file=/dev/null' '--srcdir=.' 'CC=gcc' 'LIBS='
'MPLLIBNAME=mpl'
Process Manager: pmi
Launchers available: ssh rsh fork slurm ll lsf sge manual persist
Topology libraries available: hwloc
Resource management kernels available: user slurm ll lsf sge pbs cobalt
Checkpointing libraries available:
Demux engines available: poll select
Now I can run the mpiexec command I ran before and everything works. Not exactly, the mpiexec tries to run on the remote nodes and asks for a password for dan, (I said this before, that there would be a problem), which is my username on my workstation, but not a user on the pi. Back to the internet and figure out how to change the default user name on each of the Pis. There are multiple ways to do it and maybe the best is to manually edit all the files setting the groups and passwords to substitute dan for pi
$ sudo su
$ sed -i s/pi/dan/g /etc/passwd
$ sed -i s/pi/dan/g /etc/shadow
$ sed -i s/pi/dan/g /etc/group
$ sed -i s/pi/dan/g /etc/sudoers
$ sed -i s/pi/dan/g /etc/gshadow
$ mv /home/pi /home/dan
reboot
is the easiest and involves less time and aggravation. Now I run
$ mpiexec -f nodes.ips -n 4 hostname
and wallah, (high 5’s all around and there is no one to share in my excitement, so I high 5 myself).
debian01
debian01
debian01
debian01
debian04
debian04
debian04
debian04
debian02
debian02
debian02
debian02
debian03
debian03
debian03
debian03
This is the exact answer I expected.
One thing I didn’t tell you, at the end of the IP address in the file I added a:4 so that I launched the command hostname 4 times (one on each processor on the pi). These are the little things that you pick up by reading all these sites and online documentation. The name change thing wasn’t anywhere to be seen in all the documentation, well, everyone uses a stack of pi’s and one as a head node, so they use the defaults. My system is different because I am using a dedicated workstation as the head node.
CONFIGURATION: PART 2
So now I have mpich installed and running satisfactorily. The last bit I need to have a fully functioning slrm running machine is to install slurm and munge. Slurm is the scheduler and munge is an access system that slurm uses to run the command and process the other nodes (https://linux.die.net/man/7/munge). Remember that you need to do this on all the nods of your machine, except you only generate one munge key and copy it everywhere on your cluster.
PART COSTS
Not counting the price of the workstation I already had the costs associated with this build are:
| Item | Number | Cost | Total |
|---|---|---|---|
| Raspberry pi 4B+ (8GB ram) | 1 | $94.99 | $94.99 |
| Raspberry pi 4B+ (4GB ram) | 1 | $74.99 | $74.99 |
| Raspberri pi 4 PoE HAT | 3 | $19.99 | $149.98 |
| AI PoE, 52V 65W switch | 1 | $25.99 | $25.99 |
| Geekworm Raspberry pi 4 case | 1 | $17.99 | $17.99 |
| ethernet cables (1.5 ft) pkg 10 | 1 | $16.95 | $16.95 |
| SAMSUNG 32-GB microSDHC | 3 | $7.49 | $22.47 |
| Total | $388.34 |
It’s more than I thought I would spend initially but way less than the divorce class AMD Ryzen™ Threadripper™. I wanted to get it. If you include the refurbished workstation and monitor, which was about another $500, I am still way ahead.
CONCLUSION AND TAKEAWAYS
When I started, the goal was to build a cluster and get it running so I could learn about multi-threading and message passing on a multi-node machine. Now that I have it done, I guess I want to get my programming skills up to par with mpi and on to slurm. The other thing I want to play with is to get mpi4py working so I can get more throughput at work. I generate tons of data and write Python scripts to process and plot the output of my runs. When I do that I am using a single node on a machine that I have with 100 nodes. So I am only using 1\% of the processing power of the machine to get the data into a form that I can look at and analyze.
The learning part is all the searching around for the answers to fix the fat-dumb-and-happy things I had done to myself throughout this project. Things to remember:
- Take notes. This can not be impressed hard enough. I had to start from scratch a couple of times because I didn’t keep track of what I was doing and it bit me.
- Have a plan. In addition to taking notes above, I went and did stupid on all three of the nodes without a plan for what I was doing. So, if you screw up one node, you screw up all of them and have to start from scratch, or worse yet, have to undo different paths. Take your time, do one, get it working then refer to your notes and do the same thing for the others. This is where card cloning comes in. Get one working then clone the card and just add in the new IP addresses and it would have been smoother sailing.
- Don’t get ahead of yourself and take your time getting there.
PRETTY PICTURES
So, I’ve told you about all the aggravation I went through to get the cluster to this point. That is all well and good, but what does it really look like? Well, being the poor planner that I am (sometimes) I didn’t think about pictures while I was putting all the parts together, but here are some images of the completed project.
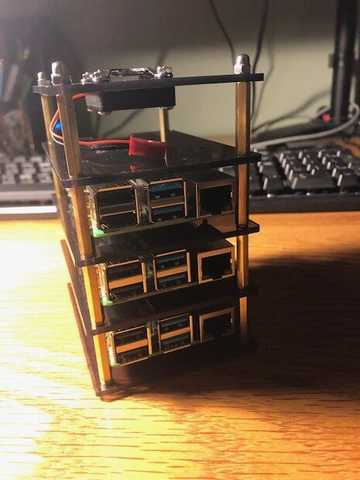
Figure 1: The pi case
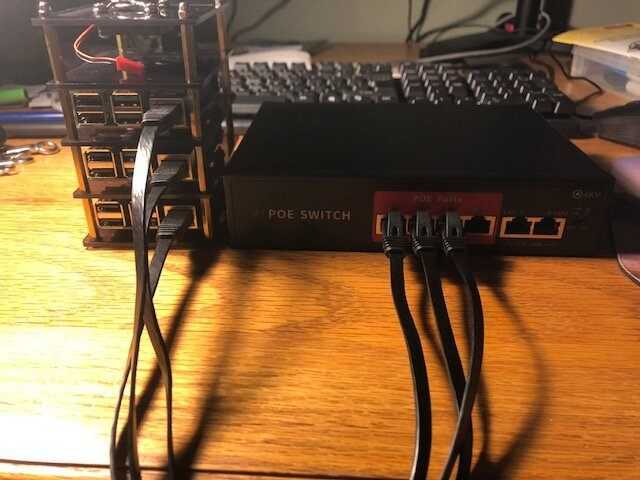
Figure 2: Pi’s and power over ethernet hub
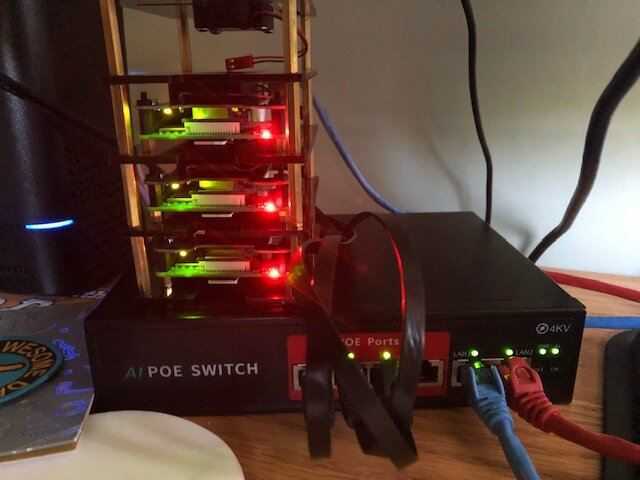
Figure 3: Pi Cluster powered up and networked in
Acknowledgment:
A thousand thank yous to Greg Bernhardt (see his tutorial on a website uptime monitor using Python and Raspberry Pi) for taking this to completion and formatting it.

PhD in Condensed Matter Physics and Masters in Optics from the University of Alabama in Huntsville, 2002 and 1994 respectively. Masters and Bachelors in Physics from the University of Buffalo. Last 20+ years in aerospace and education. Maybe the only person in the US to work on planes, ships and rotor-craft electromagnetics. Wanna be academic who enjoys lecturing but would rather teach problem sessions and labs rather than lecture.


Interesting, never thought about net-booting, I might have to investigate that. The SD cards have the operating system o it, so I don't know how to get around that.
The cluster hat is also another interesting find. To be honest, all the sites out there show a system like mine with the hardware and associated fans. I'm not sure which would be better. From a heat standpoint, I can't see the cluster hat handling the heat dissipation as well as individual fans.
"
Pi without sd card has enough intelligence to reach a tftp server and be directed to a boot directory from which it can load boot files. Ultimately it reaches a point where it can connect to network storage via NFS. Expect a fairly steep learning curve though – there are quite a few 'ingredients' needed to make it all happen!
https://linuxhit.com/raspberry-pi-pxe-boot-netbooting-a-pi-4-without-an-sd-card/
I guess the only way to test the pi zero cluster product would be to buy one and try it out.
The cluster hat is also another interesting find. To be honest, all the sites out there show a system like mine with the hardware and associated fans. I'm not sure which would be better. From a heat standpoint, I can't see the cluster hat handling the heat dissipation as well as individual fans.
Also found following product which may or may not be of interest:
https://shop.pimoroni.com/products/cluster-hat
You sure can – actually I just happen to have the 'starter kit' for you right now
Interesting article, and a Pi cluster is an interesting thing in its own right, but can't you run your CFD computations on a GPU?
"
Sure, but you forget that the codes have to be specifically written or adapted for that. I use a code at work that doesn't have gpu support for some of it's functionality. My computers at home do not have any additional gpu's either, just the graphics capability on the mother board becasue I didn't specifically purchase one.
Very true, but in my case, I have machines with ~100 nodes I am using at work and most of the tools developed haven't been upgraded to handle machines of that type.
"
Converting a program that runs in a single process and parallelizing it to take advantage of multiple/many cores has turned out to be a fairly difficult problem. A natural split for many programs is to have user interface stuff in one thread, and calculations in one or more other threads. A problem that arises is trying to keep multiple threads occupied, rather than having some of them idle while others are chugging away. For your situation with CFD calculations that take on the order of months, it really makes sense to split the computations among a bunch of nodes.
What I was doing with my 10-core machine was writing Intel AVX-512 assembly code (Advanced Vector eXtensions) that used SIMD (single instruction multiple data) instructions that could do calculations with 16 floats (512 bits) in a single operation. The calculations happened so quickly, that it didn't make sense to split them into multple threads — setting up the threads took orders of magnitude longer than the calculations required.
Mostly what I'm doing is to play around because I've never had any formal education in multi-node machines.
I've done some experimenting with multithreading on my Dell workstation at home with its 10-core Intel Xeon Scalable processor. I've found unless each thread is doing lots of work, the overhead of setting up threads means that it's probably going to take less time if you use only a single thread.