Analytical verification of FEA involving preloaded bolt

In summary: A_{c}=\frac{\pi}{4} \cdot \left( \left( D_{bolt} + \frac{L}{10} \right)^{2} - D_{hole}^{2} \right)=\frac{\pi}{4} \cdot \left( \left( 35...In summary, the bolt's stiffness is included in the calculation of its final force. However, it's unclear how to get this from the displacement of the ring under preload.
  • #1
FEAnalyst
345
144
TL;DR Summary
Is my approach to analytical verification of this finite element analysis correct ? What causes the difference ?
Hi,

I'm working on a simple FEA involving a preloaded bolt:
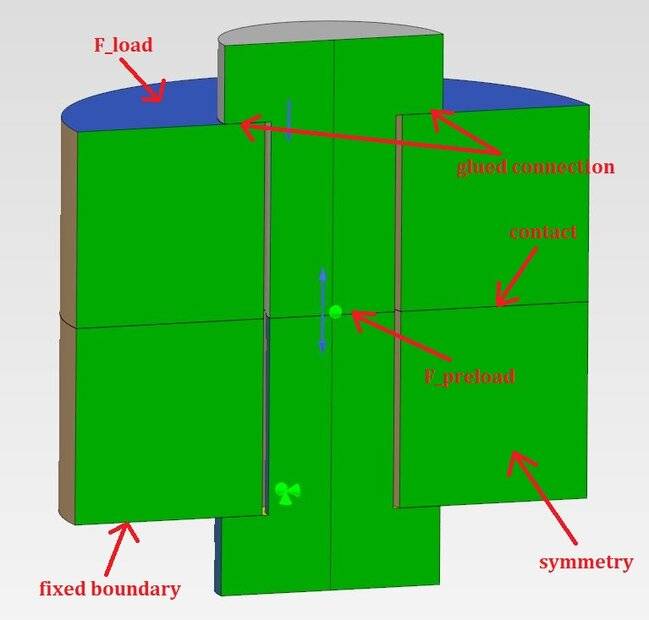
1682360626399.jpeg


The bolt is modeled as a single part (shank + head + nut), glued (perfect bonding) to both rings. Pretension force ##F_{preload}=200 \ N## is applied in the first step of the analysis while in the second, pretension force stops working and actual compressive load ##F_{load}=400 \ N## is applied to the top surface of the top ring. The bottom surface of the bottom ring is fixed in all degrees of freedom. As you can see, the model utilizes symmetry. I get some results but my goal is to verify them using simple analytical calculations. Assuming that the bolt is just a bar under tension and then compression, I get from superposition: $$\sigma=\frac{F_{preload}}{A_{bolt}}-\frac{F_{load}}{A_{ring}}$$ where: ##A_{bolt}=155.3 \ mm^{2}## - area of half of the bolt's cross-section (to which preload force is applied), ##A_{ring}=2160 \ mm^{2}## - area of the top surface of the top ring (to which actual load is applied). Thus, I get: $$\sigma=1.1026 \ MPa$$ $$F=\sigma \cdot A_{bolt}=171.24 \ N$$ while from FEA I obtain around ##188 \ N##. What can be wrong here ? Are my assumptions for the analytical calculations incorrect ? I know that I should probably use higher values but for now, it's just about figuring out the correct approach.
 
Engineering news on Phys.org
  • #2
FEAnalyst said:
TL;DR Summary: Is my approach to analytical verification of this finite element analysis correct ? What causes the difference ?

Hi,

I'm working on a simple FEA involving a preloaded bolt:

View attachment 325440

The bolt is modeled as a single part (shank + head + nut), glued (perfect bonding) to both rings. Pretension force ##F_{preload}=200 \ N## is applied in the first step of the analysis while in the second, pretension force stops working and actual compressive load ##F_{load}=400 \ N## is applied to the top surface of the top ring. The bottom surface of the bottom ring is fixed in all degrees of freedom. As you can see, the model utilizes symmetry. I get some results but my goal is to verify them using simple analytical calculations. Assuming that the bolt is just a bar under tension and then compression, I get from superposition: $$\sigma=\frac{F_{preload}}{A_{bolt}}-\frac{F_{load}}{A_{ring}}$$ where: ##A_{bolt}=155.3 \ mm^{2}## - area of half of the bolt's cross-section (to which preload force is applied), ##A_{ring}=2160 \ mm^{2}## - area of the top surface of the top ring (to which actual load is applied). Thus, I get: $$\sigma=1.1026 \ MPa$$ $$F=\sigma \cdot A_{bolt}=171.24 \ N$$ while from FEA I obtain around ##188 \ N##. What can be wrong here ? Are my assumptions for the analytical calculations incorrect ? I know that I should probably use higher values but for now, it's just about figuring out the correct approach.
The deflection of the ring under ##F_l## is what determines the final tensile load remaining in the bolt, as the change in deflections of the bolt and ring must be equal in magnitude from the applied load. I think in practice it's going to be tricky to figure this out.

You can imagine as you tighten the bolt, the length of it under stress is decreasing ( i.e. the preload, and initial length are not independent). Furthermore, we need to find the initial deflection of the ring under preload because the deflections are measured from free length of each member.
 
Last edited:
  • #3
erobz said:
The deflection of the ring under Fl is what determines the final tensile load remaining in the bolt, as the change in deflections of the bolt and ring must be equal in magnitude from the applied load. I think in practice it's going to be tricky to figure this out.
Right, deformation/stiffness of the rings also influences the results here. However, I thought that it could be ignored. My previous similar model gave very good agreement with analytical results obtained with the formulas from my first post. The main difference between the previous and current model is the way the bolt is connected with rings - in the first case cylinders representing the head and nut were bonded with the faces of the holes in the rings, in the second case (current model) they are bonded with the top faces of the rings. There are formulas (some quite complex) to estimate stiffnesses of all components (bolt and rings) and this way I could calculate the displacement but how can I get the final force in the bolt from that ?
 
  • #4
I performed some additional calculations taking into account bolt and joint stiffness, based on this article: https://www.endeavos.com/finite-element-analysis-of-bolted-connections-part-2/ which uses equations from "An Introduction to the Design and Behavior of Bolted Joints" by J.H. Bickford. Here are my calculations (this time with values for the whole joint, not half of it due to symmetry like before):

- equivalent cylinder cross-sectional area: $$A_{c}=\frac{\pi}{4} \cdot \left( \left( D_{bolt} + \frac{L}{10} \right)^{2} - D_{hole}^{2} \right)=\frac{\pi}{4} \cdot \left( \left( 35 + \frac{60}{10} \right)^{2} - 22^{2} \right)=940.1216 \ mm^{2} $$
where: ##D_{bolt}## - diameter of contact between bolt head and joint, ##L## - height of bolt shank/joint, ##D_{hole}## - diameter of the hole in the joint

- bolt stiffness: $$K_{bolt}=\frac{E \cdot A_{bolt}}{L}=\frac{210000 \cdot 310.6}{60}=1.0871 \cdot 10^{6} \ \frac{N}{mm}$$
where: ##E## - Young's modulus, ##A_{bolt}## - cross-sectional area of the bolt

- joint stiffness: $$K_{joint}=\frac{E \cdot A_{c}}{L}=\frac{210000 \cdot 940.1216}{60}=3.2904 \cdot 10^{6} \ \frac{N}{mm}$$
- load factor: $$\Phi=\frac{K_{bolt}}{K_{bolt}+K_{joint}}=\frac{1.0871 \cdot 10^{6}}{\left(1.0871 \cdot 10^{6} \right)+ \left(3.2904 \cdot 10^{6} \right)}=0.2483$$
- bolt force: $$F_{bolt}=F_{preload}+ \Phi \cdot F_{load}=400+ 0.2483 \cdot \left(-800 \right)=201.3307 \ N$$
- joint force: $$F_{joint}=F_{preload}- \left( 1- \Phi \right) \cdot F_{load}=400- \left( 1- 0.2483 \right) \cdot \left(-800 \right)=1001.3307 \ N$$
Thus, when I calculate half of the bolt force (to compare it with FEA model), I get ##100.6653 \ N## which is nowhere near ##188 \ N## obtained from the simulation. Also, joint force seems to large. Any ideas where the mistake can be? Perhaps I should account for the fact that ##F_{load}## is compressive (not tensile like in the sources of the formulas) in a different way than just setting its value to negative but this seems to make sense.
 
  • #5
I'm trying to wrap my head around the math involved in the coupling of the deflection of the joint, and negative deflection of the bolt from pre-load...so far unsuccessfully.

I feel like those equations you found are for separating a joint, I don't know how cleanly they work in reverse.
 
  • #6
erobz said:
I feel like those equations you found are for separating a joint, I don't know how cleanly they work in reverse.
Indeed, they are meant for joints under tensile load (separation force is also calculated in the article). It might be possible that they won't work when the joint is under compression but I reversed the load in my calculations to make it tensile and there's still no agreement. I got around ##400 \ N## from the simulation and around ##300 \ N## as half of ##F_{bolt}## from the analytical solution. I also tried applying the external load to the top of the bolt head instead of the top surface of the top ring (like it was done in the article) but it didn't help. The simulation result was different but there was no way to account for it in the analytical calculations.
 
Last edited:
  • #7
Here is what I can come up with. We start with the bolt and joint unloaded. The initial length of the joint is ##l_j##:

1682546488066.png


Next apply the load ##P## (pre-load) by tightening the bolt. The joint compresses and the section of the bolt between the nut and the head stretches. Let ##l_p## be the final length of the joint and shank after the application of ##P##:

1682546772478.png


Let ##l_b## be the initial unstretched length of the shank between the head and the nut. It follows that:

$$ l_j + \delta l_j = l_p= l_b + \delta l_b $$

$$ l_j - \frac{P l_j}{A_j E_j} = l_b + \frac{P l_b}{A_b E_b} $$

$$\implies l_b = l_j \frac{ \left( 1 - \frac{P}{A_j E_j} \right) }{ \left( 1+ \frac{P}{A_b E_b} \right) } \tag{1} $$

Next apply compressive load ##F## to the joint, observing deflection ##x##. The load ##P## will diminish as a function of ##x##:

1682558389003.png


$$ P(x) = \left( (l_p - x) - l_b\right)\frac{A_b E_b}{l_b} \tag{2} $$

The internal forces in the joint are from static equilibrium:

$$ F + P(x) = P + \frac{A_j E_j}{l_j}x \tag{3}$$

Substitute (2) into (3) and solve for the deflection ##x##:$$ F + \cancel{ \overbrace{\left( l_p -l_b \right) \frac{A_b E_b}{l_b}}^{P}} - x \frac{A_b E_b}{l_b} = \cancel{P} + \frac{A_j E_j}{l_j}x $$

$$ \implies x = \frac{F}{ \frac{A_j E_j}{l_j}+\frac{A_b E_b}{l_b} } \tag{4}$$

Then sub (4) and (1) into (2) to find the remaining tension ##P_r## in the bolt:

$$ P_r = \left( l_j - \frac{P l_j}{A_j E_j} - \frac{F}{ \frac{A_j E_j}{l_j}+\frac{A_b E_b}{ l_j \frac{ \left( 1 - \frac{P}{A_j E_j} \right) }{ \left( 1+ \frac{P}{A_b E_b} \right) }} } -l_j \frac{ \left( 1 - \frac{P}{A_j E_j} \right) }{ \left( 1+ \frac{P}{A_b E_b} \right) }\right)\frac{A_b E_b}{ l_j \frac{ \left( 1 - \frac{P}{A_j E_j} \right) }{ \left( 1+ \frac{P}{A_b E_b} \right) }} \tag{2} $$I have no idea if this works out or I bungled something(s). Probably best just to test it numerically.
 
Last edited:
  • #8
erobz said:
Here is what I can come up with. We start with the bolt and joint unloaded. The initial length of the joint is ##l_j##:
...
I have no idea if this works out or I bungled something(s). Probably best just to test it numerically.
Thank you very much for this derivation. I got ##351.8068 \ N## for my full model (and thus ##175.9034 \ N## for half model) from this equation which is close to what I got with the first approach described in my initial post but unfortunately far from that advanced approach with an equivalent cylinder. I also checked FEA with a full model to avoid confusion caused by symmetry and it gave me ##376.769 \ N## so the first result from FEA for half model (##188 \ N##) should be correct. But so large differences between the advanced approach and simulation shouldn't be happening. I'm probably making some silly mistake somewhere here.
 
  • #9
FEAnalyst said:
Thank you very much for this derivation. I got ##351.8068 \ N## for my full model (and thus ##175.9034 \ N## for half model) from this equation which is close to what I got with the first approach described in my initial post but unfortunately far from that advanced approach with an equivalent cylinder. I also checked FEA with a full model to avoid confusion caused by symmetry and it gave me ##376.769 \ N## so the first result from FEA for half model (##188 \ N##) should be correct. But so large differences between the advanced approach and simulation shouldn't be happening. I'm probably making some silly mistake somewhere here.
Well thanks for checking it.

If you change the parameters, making bolt and joint material different, initial joint length, etc... how well does the simple subtraction of stresses (in your OP) perform? I don't think it should perform well against what I've shown. It seems like too much of a "shortcut" to be robust, but I'm curious that they are in relative agreement at all?
 
  • #10
Problem solved, thank you for your help. I got very good agreement when I changed the formula for the joint stiffness to one based on a loaded elastic half-space problem, made the bolt 2 times longer and changed the load/boundary condition application regions so that they correspond to the model described in the article.
 
  • Like
Likes erobz and berkeman

FAQ: Analytical verification of FEA involving preloaded bolt

What is the purpose of preloading a bolt in FEA simulations?

Preloading a bolt in FEA simulations is essential to replicate the actual conditions under which the bolt will operate. This helps in accurately predicting the stress distribution, deformation, and overall behavior of the bolted joint under various loads. Preloading ensures that the bolt remains tight and prevents joint separation or loosening during service.

How do you apply preload to a bolt in an FEA model?

Preload can be applied to a bolt in an FEA model by using techniques such as the application of an initial tensile force or displacement. This is typically done by specifying the desired preload force or by defining an initial bolt stretch. Some FEA software also allows for the use of a "bolt pretension" element or feature, which simplifies the process of applying preload.

What are the common challenges in verifying the analytical results of preloaded bolts in FEA?

Common challenges include accurately modeling the contact interactions between the bolt and the connected parts, ensuring that the preload is applied correctly without causing numerical instability, and validating the FEA results with experimental data or analytical calculations. Additionally, capturing the effects of friction and ensuring mesh quality around the bolt and joint areas can also be challenging.

How can you validate the FEA results of a preloaded bolt?

Validation of FEA results can be done by comparing the simulation outcomes with experimental data, if available. Analytical calculations based on classical mechanics or simplified models can also be used for comparison. Key metrics for validation include the stress distribution in the bolt and the joint, bolt elongation, and the overall stiffness of the assembly. Ensuring that the FEA results align with theoretical expectations and practical observations is crucial for validation.

What are the effects of preload on the stress distribution in a bolted joint?

Preload significantly affects the stress distribution in a bolted joint. It introduces an initial tensile stress in the bolt and compressive stress in the connected parts. This preload helps in maintaining joint integrity under external loads by preventing separation and reducing the risk of fatigue failure. The stress distribution will vary depending on the magnitude of the preload, the geometry of the joint, and the material properties of the components involved.

Similar threads

Back
Top