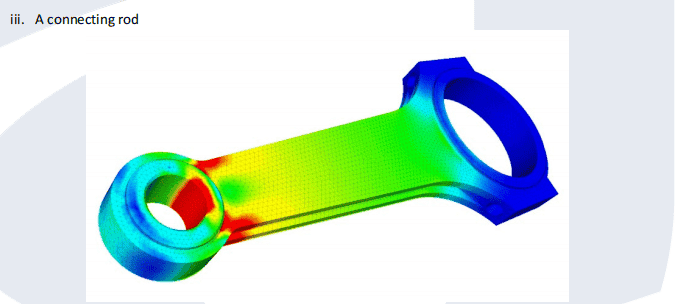
FEA question (stuck): Stress analysis on this Connecting Rod

In summary, this lattice truss is designed to have high pressure in the red zone, where the stresses are greatest, and low pressure on the other zones to help distribute the stress.
  • #1
Smushiehippo
10
0
Homework Statement
1) Explain where the first point of failure is likely to originate, and why.
2) An analysis of the studies, do you think that they will be an accurate representation of what will
happen in practice? how would you improve it.
Relevant Equations
none
Hey

Im doing FEA and got stuck on question. The diagram go me stuck, because looking through the workbook it says high stresses are in red and low in blue, whereas they included both different kind of stresses on the same diagram and no data.
Screenshot (1319).png

Note: High Compressive strains are noted by blue, high tensile strains are noted in red, low strains are noted as light
blue/green/yellow.

What I Put
I think first point of failure would be located at the small end, where there is high tensile stress. the high tensile stress would cause deformation and fatigue fractures leading to failure.

For part 2 of the question - I layed out how FEA works, what the accuracy of the data depended on. i stated different methrod of checking (check with other collugues, past results, rerun simulations).

I believe comparing this result with past results ran the diagrams show a high level of accuracy, but cannot be 100% certain of accuracy. I do believe areas on the diagram may give errors in results, big end due to zero radius omitting tensiles stress. Ways to improve to include data on the stress to see if it exceeds yeild stress and put different stress on different diagrams.
cheers for reading
 
Physics news on Phys.org
  • #2
Smushiehippo said:
Note: High Compressive strains are noted by blue, high tensile strains are noted in red, low strains are noted as light
blue/green/yellow.
I think that is incorrect.
I believe the connecting rod is shown under compression only. The highest pressure is where the gudgeon = piston pin, presses against the inside of the small end, shown as red. The big end has a greater area on the crank, so less stress. The blue is zero or neutral. The outer ends of the rod carry no load when under compression.

As the tapered rod is compressed, the narrower sections have greater stresses. That explains the colours changing along the length of the rod. The rod must be tapered to connect the small piston pin to the crank bearing.

The piston pin bearing has a low surface speed, and only swings through a small angle. It may have only splash lubrication. The big end has a higher bearing surface velocity, but also has forced lubrication. Red is an obvious problem.
 
  • Like
Likes DeBangis21 and Lnewqban
  • #3
Baluncore said:
I think that is incorrect.
I believe the connecting rod is shown under compression only. The highest pressure is where the gudgeon = piston pin, presses against the inside of the small end, shown as red. The big end has a greater area on the crank, so less stress. The blue is zero or neutral. The outer ends of the rod carry no load when under compression.

As the tapered rod is compressed, the narrower sections have greater stresses. That explains the colours changing along the length of the rod. The rod must be tapered to connect the small piston pin to the crank bearing.

The piston pin bearing has a low surface speed, and only swings through a small angle. It may have only splash lubrication. The big end has a higher bearing surface velocity, but also has forced lubrication. Red is an obvious problem.
That's what I thought about the diagram and notes being wrong. But unicourse only gave me the diagrams with those notes and won't respond to my emails about it being potential wrong so kind of stuck
 
  • #4
1682713060385.png
This looks like an old design of an equal-space lattice truss whose strains are not supported to equalize the strain. Especially the outer triangles are the weakest.
More like this
1682714163377.png

1682713676121.png
The Red zone has the highest pressure but this needs pressurized oil on the sleeve bearing during the low pressure up stoke to fill the red zone. I added two gray oil holes on the opposite side of the high force bearings which will allow oil to be pumped and forced down to the red zone.
 

Related to FEA question (stuck): Stress analysis on this Connecting Rod

1. What boundary conditions should I apply for stress analysis on a connecting rod?

For a connecting rod, typical boundary conditions include fixing the small end where it connects to the piston and applying a force or displacement at the big end where it connects to the crankshaft. You may also need to account for rotational constraints depending on the specific setup of your model.

2. How do I determine the material properties for the connecting rod in FEA?

The material properties for the connecting rod should be obtained from material data sheets or manufacturer specifications. Key properties include Young's modulus, Poisson's ratio, density, yield strength, and ultimate tensile strength. Ensure that these properties are input correctly into your FEA software.

3. What type of mesh should I use for accurate stress analysis of a connecting rod?

A finer mesh is generally recommended for areas with high stress concentrations, such as fillets and holes. A combination of tetrahedral and hexahedral elements can be used, with hexahedral elements providing better accuracy in regions with regular geometry. Ensure mesh refinement in critical areas to capture stress gradients accurately.

4. How do I interpret the stress results from the FEA of a connecting rod?

Interpret the stress results by examining the von Mises stress distribution, which provides a good indication of yielding under complex loading. Compare the maximum von Mises stress to the material's yield strength to assess the safety factor. Also, look for stress concentrations that may indicate potential failure points.

5. What are common sources of error in FEA stress analysis of a connecting rod?

Common sources of error include improper boundary conditions, incorrect material properties, insufficient mesh density, and ignoring dynamic effects. Ensure that all inputs are accurate and that the model is validated against experimental data or analytical solutions if possible. Additionally, convergence studies should be performed to ensure that the results are independent of the mesh size.

Similar threads

Replies
8
Views
1K
Replies
9
Views
2K
Replies
14
Views
950
Replies
4
Views
16K
Replies
16
Views
4K
Back
Top