GD&T- Positional tolerance question

  • Thread starter mhrob24
  • Start date
  • Tags
    Tolerance
In summary, the designer wants the tolerance applied separately to the basic dimensions constraining the holes to datum B and C. The designer would add the dimensions from C or the lower surface, plus the tolerance for that one.
  • #1
mhrob24
53
9
TL;DR Summary
Positional tolerance for hole pattern
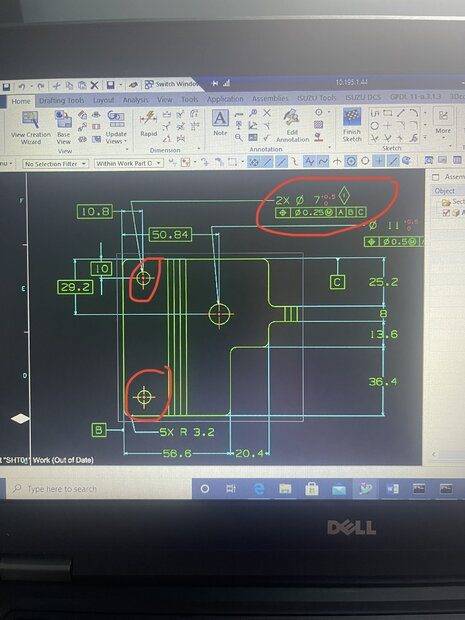
I have a 2 hole pattern that I’d like to control individually (meaning I don’t want them to move as a unit….I want the tolerance to be applied separately for each hole position). However, they are the same DIA, so can I just do something like this (see below)? Like, by leaving out the distance between the two holes and putting “2x” next to the tolerance box, I believe this is implying that the tolerance is separately applied to the basic dimensions constraining the holes to datum B and C. Whereas if I added the dimension for the spacing, it would imply that the holes are to be positioned as a unit (both holes can move simultaneously within the 0.25 mm tolerance zone, and the spacing would also be constrained to a 0.25mm deviation)

Is this correct? Or would I need to have a separate feature control frame for each hole?
1641155555649.jpeg
 
Last edited:
Engineering news on Phys.org
  • #2
As it is now, there is no reference or dimension for the location of the lower hole.
I would add those two dimensions (from C or the lower surface, rather than from the center of the upper hole), plus the tolerance for that one.
 
  • #3
Lnewqban said:
As it is now, there is no reference or dimension for the location of the lower hole.
I would add those two dimensions (from C or the lower surface, rather than from the center of the upper hole), plus the tolerance for that one.
Ok see that’s what I was wondering as well….the reason I left the bottom hole dimensions off is because the geometry is symmetrical around both holes (meaning that the basic dimensions locating the top hole are exactly the same as the bottom)….so I still need to add those dimensions to the bottom hole as well?
 
  • Like
Likes Lnewqban
  • #4
I would say yes.
Omitting those dimensions may create confusion in a machinist, who may be not familiar with that part and the mentioned symmetry.

As a vertical symmetry exists, and the center of the lower hole is to be measured from the lower surface, the total distance between reference C and the lower surface should be included, with tolerance perhaps.

It is always good practice to imaging that the person(s) performing the machining knows nothing about the requirements that the designer has in mind.
Unless it is incorrect or contradictory, the more information, the better (especially when a high number of parts are to be fabricated).

For example, total exterior dimensions tell a machinist what size of metal he needs to initially cut, rather than leaving the math of adding up partial dimensions to him, with the potential of error and wasted material and effort.
 

FAQ: GD&T- Positional tolerance question

What is positional tolerance in GD&T?

Positional tolerance is a geometric dimensioning and tolerancing (GD&T) symbol that specifies the allowable deviation of a feature from its true position. It is used to control the location of a feature in relation to a reference point or datum.

How is positional tolerance represented in a GD&T drawing?

Positional tolerance is represented by a concentric circle with a horizontal line intersecting it, followed by a tolerance value. The tolerance value indicates the maximum allowable deviation of the feature from its true position.

What is the difference between true position and positional tolerance?

True position is the exact location of a feature in relation to a datum, while positional tolerance is the allowable deviation from the true position. In other words, true position is the ideal location and positional tolerance is the acceptable range of deviation from that ideal location.

How is positional tolerance calculated?

Positional tolerance is calculated by multiplying the tolerance value by a factor based on the size of the feature and the tolerance zone specified. This factor can be found in GD&T reference books or online calculators.

What are the benefits of using positional tolerance in GD&T?

Using positional tolerance allows for more precise control of the location of features, ensuring proper fit and function of mechanical parts. It also allows for easier and more accurate inspection of parts, reducing the likelihood of errors and rework.

Back
Top