Interpretation of Isometric Drawing

In summary, the conversation discusses the difficulties of creating a third angle projection of an isometric drawing due to the positioning of a circle with a radius of 25. The individual has attempted two different methods, but is still struggling to achieve the correct curvature in the drawing. They receive advice on how to properly connect the circles and are reminded of the limitations of the side view due to poorly specified dimensions. Ultimately, they decide to go with their second attempt and are grateful for the help provided.
  • #1
Sirsh
267
10
I am trying to create a third angle projection of this isometric drawing and for the most part it is very straight forward. However, I cannot figure out where to position a 'circle' of radius 25 to give me the correct curvature that is required for this drawing.

Whenever I locate a circle and then try to connect a straight line to it, I get some awkward connection as seen below where it seems like there is a 'jump'.

Here is the isometric drawing that I have (red is the dimension I'm having issues with):
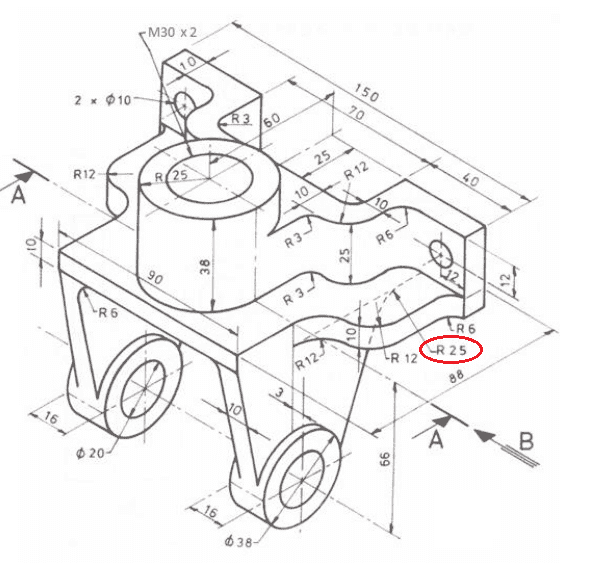
4vfn2b.png


Attempt 1:
Screen_Shot_2016_03_29_at_12_30_07_pm.png


Attempt 2:
Screen_Shot_2016_03_29_at_12_30_31_pm.png


Any help is much appreciated!
 
Physics news on Phys.org
  • #2
Sirsh said:
I am trying to create a third angle projection of this isometric drawing and for the most part it is very straight forward. However, I cannot figure out where to position a 'circle' of radius 25 to give me the correct curvature that is required for this drawing.

Whenever I locate a circle and then try to connect a straight line to it, I get some awkward connection as seen below where it seems like there is a 'jump'.

Here is the isometric drawing that I have (red is the dimension I'm having issues with):
4vfn2b.png


Attempt 1:
Screen_Shot_2016_03_29_at_12_30_07_pm.png


Attempt 2:
Screen_Shot_2016_03_29_at_12_30_31_pm.png


Any help is much appreciated!
I think your Attempt #2 is the closest to what the iso shows.

In drawing the line between the two circles, you want each end of the line to be tangent to its respective circle. Most CAD programs allow you to specify lines in this manner.

You can't do much else with the side view because the R25 location is so poorly specified on the iso.
 
  • #3
SteamKing said:
I think your Attempt #2 is the closest to what the iso shows.

In drawing the line between the two circles, you want each end of the line to be tangent to its respective circle. Most CAD programs allow you to specify lines in this manner.

You can't do much else with the side view because the R25 location is so poorly specified on the iso.

As always, thank you for your help. I went with drawing #2 as there isn't anyway the other is the correct interpretation of the drawing, in my opinion.
 
  • #4
The old fashioned way using paper an pencil would be to draw two construction lines parallel to and 25mm away from the lines you are blending together. Where they cross is the centre of the rad.

PS I believe the web should be symmetrical about the 38mm diameter hole as per your second attempt?
 

FAQ: Interpretation of Isometric Drawing

What is the purpose of an isometric drawing?

An isometric drawing is used to represent a three-dimensional object in a two-dimensional form. It allows for a more accurate visual representation of an object's dimensions and proportions.

How is an isometric drawing different from other types of drawings?

An isometric drawing is different from other types of drawings, such as perspective or orthographic drawings, because it shows all three dimensions of an object at once. This means that the object is viewed from a fixed angle, rather than from different viewpoints.

What are the advantages of using isometric drawings?

Isometric drawings have several advantages, including being able to accurately depict the size and shape of an object, being easy to understand and interpret, and being useful for creating technical drawings for engineering and architecture projects.

How do you interpret measurements on an isometric drawing?

To interpret measurements on an isometric drawing, you need to understand the scale used for the drawing. The scale will determine the relationship between the measurements on the drawing and the actual dimensions of the object. You can then use a ruler or other measuring tool to determine the exact measurements on the drawing.

What are some common mistakes to avoid when interpreting isometric drawings?

Some common mistakes to avoid when interpreting isometric drawings include not using the correct scale, misinterpreting angles or proportions, and not considering hidden lines and features. It is important to carefully study the drawing and understand the conventions used for isometric drawings to avoid these mistakes.

Similar threads

Back
Top