Non-uniform stress distrubution

In summary: Calculate the average width of the 1/2 section between the base and top. This is 27.5 mm.2) Calculate the average strain in the 1/2 section. The average strain is .0053 mm/mm of height.3) Add the average strain from step 1 and the average strain from step 2. This gives the total average strain in the 1/2 section.4) Subtract the average width of the 1/2 section from the total average strain. This gives the deflection in the 1/2 section.5) Divide the deflection in the 1/2 section by the average width of the 1/2 section to get the percentage of deflection.
  • #1
HannaMadd
3
0
Hi everyone!

I have perhaps a basic question, but I can't dealt with it.
I have a rectangular sample 50x150mm of let's say wood. The sample is compressed from the top over the width of 4mm. I know the shortening of the sample at 70 mm from the bottom (from experimental testing) and I know the force. The shortening is 0.2mm. But I need to know how much the sample shortens at the top, assuming triangle stress distribution. This is a 2D problem. Please, take a look at the sketch.

Thank you for any suggestions!

Hana
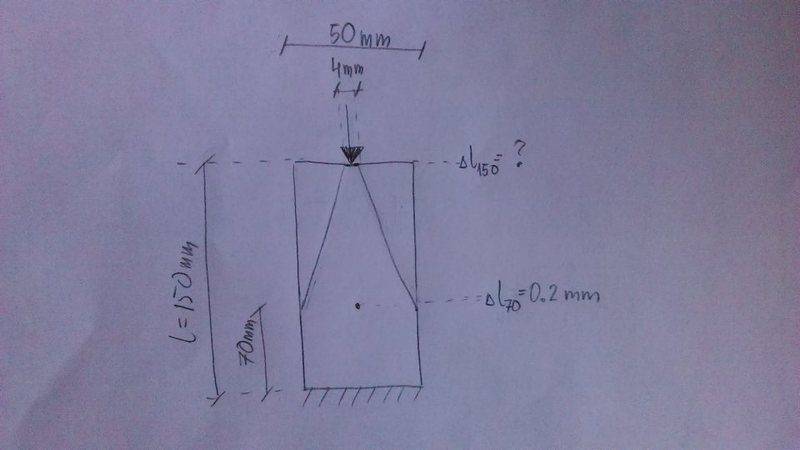
sketch.JPG
 
Engineering news on Phys.org
  • #2
There may be better methods but this is how I would solve the problem.
(With the assumption that the 150 mm and 70 mm height dimensions shown are before the load was applied and the .2 mm deflection occurred.)

1. Since you know the amount of change in the bottom constant width section you can calculate the amount of strain (mm of compression per mm height of the bottom section) by dividing the .2 mm of deflection by the 70 mm of height of that section.

2. Since the amount of strain under a load is proportional to the load / area of the part x- section; so as long as the thickness of the part is constant the widths of the part are an accurate for determining the ratio of strain; so, as the width of the triangular section decreases with height, the amount of strain increases proportionally.

3 For the type of truncated triangle shown the average width of the this section is 1/2 of the difference between the base width and and top width = (50 + 4) / 2 = 27 mm and this can be used to calculate the top section average strain vs the strain at the width of the base of the triangle with the formula:
average top section strain = (base width / average triangle width) x the base section strain. = (50 / 27) x (.2 / 70) = .0053 mm / mm of height

4. As a result, the top section deflection = .0053 x (150 - 70) = 0.423 mm (rounded to 3 decimal places) and the total deflection at the top of the piece = .2 + .423 = 0.643 mm
 
  • #3
JBA said:
There may be better methods but this is how I would solve the problem.
(With the assumption that the 150 mm and 70 mm height dimensions shown are before the load was applied and the .2 mm deflection occurred.)

1. Since you know the amount of change in the bottom constant width section you can calculate the amount of strain (mm of compression per mm height of the bottom section) by dividing the .2 mm of deflection by the 70 mm of height of that section.

2. Since the amount of strain under a load is proportional to the load / area of the part x- section; so as long as the thickness of the part is constant the widths of the part are an accurate for determining the ratio of strain; so, as the width of the triangular section decreases with height, the amount of strain increases proportionally.

3 For the type of truncated triangle shown the average width of the this section is 1/2 of the difference between the base width and and top width = (50 + 4) / 2 = 27 mm and this can be used to calculate the top section average strain vs the strain at the width of the base of the triangle with the formula:
average top section strain = (base width / average triangle width) x the base section strain. = (50 / 27) x (.2 / 70) = .0053 mm / mm of height

4. As a result, the top section deflection = .0053 x (150 - 70) = 0.423 mm (rounded to 3 decimal places) and the total deflection at the top of the piece = .2 + .423 = 0.643 mm

Hi JBA! Thank you for your reply.

My only doubt now is the point 3 in your answer. If we take an average width of 27mm, is your solution equivalent to the one in the sketch below?

sketch 2.JPG
 
  • #4
I'm glad you questioned my above procedure because I began the following calculation to show that it would give the same results as my first post procedure; but it clearly does not support that calculation. After some reviewing of my first procedure using the 27 mm average width I have found that there is an error in my selection of that width for the average strain calculation. The below is an accurate (and more straight forward) method of calculating the deflection for the triangular section and total deflection at the top of the figure. I apologize for misleading you with my erroneous first post procedure.

To describe the process another way:
Strain at 50 mm base width = .2 / 70 = .0029 mm / mm height
Strain at 4 mm top width = (.0029) x (50 /4) = .0363 mm / mm height
Since the strain varies linearly between the top and bottom widths of the triangular section your can average those two values to get the average strain for that complete section = (.0363 +.0029) / 2 = .0196 mm / mm height
Therefore, deflection of the top 80 mm section = .0196 x 80 = 1.568 mm and the total deflection at the top of the figure = .2 + 1.568 = 1.768 mm

PS When the correct average width is used, the first method with a representative rectangle width and equivalent strain value at that width is an accepted equivalent method of calculating total deflection for the varying area of a triangular section such as in your figure, so I am working to find my error in determining the correct representative rectangle width in that first calculation.
 
  • #5
JBA said:
I'm glad you questioned my above procedure because I began the following calculation to show that it would give the same results as my first post procedure; but it clearly does not support that calculation. After some reviewing of my first procedure using the 27 mm average width I have found that there is an error in my selection of that width for the average strain calculation. The below is an accurate (and more straight forward) method of calculating the deflection for the triangular section and total deflection at the top of the figure. I apologize for misleading you with my erroneous first post procedure.

To describe the process another way:
Strain at 50 mm base width = .2 / 70 = .0029 mm / mm height
Strain at 4 mm top width = (.0029) x (50 /4) = .0363 mm / mm height
Since the strain varies linearly between the top and bottom widths of the triangular section your can average those two values to get the average strain for that complete section = (.0363 +.0029) / 2 = .0196 mm / mm height
Therefore, deflection of the top 80 mm section = .0196 x 80 = 1.568 mm and the total deflection at the top of the figure = .2 + 1.568 = 1.768 mm

PS When the correct average width is used, the first method with a representative rectangle width and equivalent strain value at that width is an accepted equivalent method of calculating total deflection for the varying area of a triangular section such as in your figure, so I am working to find my error in determining the correct representative rectangle width in that first calculation.
Thank you for your explanation. It is more clear now.
 

FAQ: Non-uniform stress distrubution

What is non-uniform stress distribution?

Non-uniform stress distribution refers to the uneven distribution of stress on a material or structure. This means that different parts of the material or structure experience different levels of stress, which can lead to potential weaknesses or failures.

What causes non-uniform stress distribution?

Non-uniform stress distribution can be caused by a variety of factors, such as variations in material properties, geometric irregularities, and external forces. It can also be a result of design flaws or manufacturing errors.

What are the consequences of non-uniform stress distribution?

If left unchecked, non-uniform stress distribution can lead to structural failure or premature wear and tear on materials. This can result in safety hazards, costly repairs, and potential damage to surrounding structures.

How can non-uniform stress distribution be measured?

Non-uniform stress distribution can be measured using various techniques such as strain gauges, finite element analysis, and optical methods. These methods allow for the visualization and quantification of stress distribution on a material or structure.

How can non-uniform stress distribution be minimized?

Non-uniform stress distribution can be minimized through proper design and material selection, as well as regular inspections and maintenance. It is also important to avoid overloading structures and to distribute loads evenly to reduce stress concentrations.

Similar threads

Replies
6
Views
2K
Replies
7
Views
2K
Replies
5
Views
15K
Replies
15
Views
53K
Replies
1
Views
1K
Replies
21
Views
23K
Replies
11
Views
4K
Back
Top