What Are Tolerances on Dimensions with Deviations in DIN 16901?

  • Thread starter patehi
  • Start date
  • Tags
    Reading
In summary, the conversation was about a drawing referencing DIN 16901 for tolerances and a table of DIN 16091 that was unclear. The first half of the table had + and - symbols for tolerances while the second half did not. It was assumed that the second set of numbers were just double the top set for the given row/col. The question was asked about what "tolerances on dimensions with deviations entered against the dimensions" meant. The response was that it was seen on a drawing without tolerances and only a remark mentioning DIN 16901.
  • #1
patehi
11
0
Hi all,

i have stumbled across a drawing which referenced DIN 16901 for its tolerance. I have a table of DIN 16091 which i don't understand.

For the first half of the tables, the tolerances are + and -, which i understand. The second half (tolerances on dimensions with Deviations entered against the dimensions) are without +/- symbols. Can i assume that the tolerances are always + ?
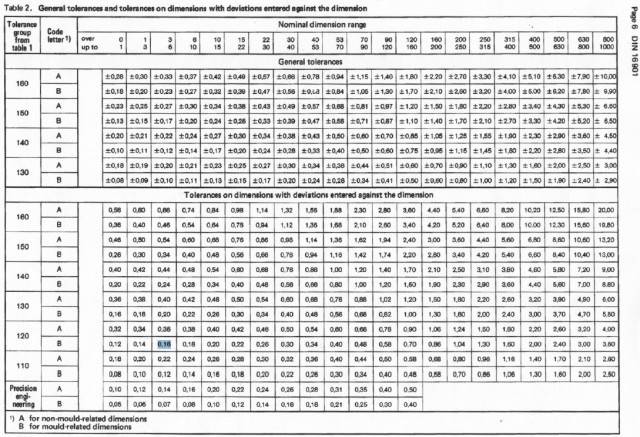
DIN16091_tolerance.jpg


Thanks guys for your help!
 

Attachments

  • DIN16091_tolerance.jpg
    DIN16091_tolerance.jpg
    10.3 KB · Views: 4,940
  • DIN16091_tolerance.jpg
    DIN16091_tolerance.jpg
    72.3 KB · Views: 12,212
Engineering news on Phys.org
  • #2
It looks like the second set of numbers are just twice the top set for the given row/col

so if the cell says +-0.20 then the corresponding cell says 0.40
 
  • #3
it Looks like it as well, but what are "tolerances on dimensions with deviations entered against the dimensions"?
I am inspecting a sampe, and have a drawing and the dimensions are with no tolerances. The only indication is in the remark section, "tolerances are according to DIN 16901".
 

FAQ: What Are Tolerances on Dimensions with Deviations in DIN 16901?

1. What is DIN 16901?

DIN 16901 is a standard set by the German Institute for Standardization (DIN) that specifies the tolerances for dimensions, form, and position of mechanical engineering components, particularly those used in production and assembly processes.

2. Why are reading tolerances important?

Reading tolerances are important because they ensure consistency and accuracy in the manufacturing and assembly of mechanical components. Tolerances allow for variations in dimensions and form, while still maintaining the functionality and compatibility of the parts.

3. How are tolerances measured?

Tolerances are typically measured in units such as millimeters (mm) or micrometers (μm). They are determined by comparing the actual dimensions of a component to the specified dimensions in the design or blueprint. Tolerances can also be measured using specialized tools and equipment, such as calipers or coordinate measuring machines.

4. What is the difference between unilateral and bilateral tolerances?

Unilateral tolerances only allow for variation in one direction, either above or below the specified dimension. Bilateral tolerances allow for variation in both directions, above and below the specified dimension. Unilateral tolerances are typically used for simpler components, while bilateral tolerances are used for more complex components.

5. How do DIN 16901 tolerances compare to other standards?

DIN 16901 is a widely recognized and respected standard for tolerances in mechanical engineering. It is similar to other standards such as ISO and ANSI, but may have slight variations in specific tolerances and measurement methods. It is important to consult the specific standard required for a particular project or application.

Similar threads

Back
Top