Vibration testing on shaker - High amplitude observed

In summary, the conversation discusses a test fixture for small satellites and the observation of high amplitude in the Y-direction. The participants suggest checking the center of gravity and using a strobe light to gather more information. They also discuss the possibility of a sensitivity difference in the accelerometer and suggest testing the sensor on the shaker plate.
  • #1
FAlonso
112
4
Hello everyone, I wanted to gather opinion from anyone experienced in vibration regarding one of test fixtures I have created for small satellites. The image below shows the Test-POD that I am testing on a single axis shaker. In one of the tests, I had troubles that the amplitude got higher than limits (3g) in Y-direction. This is not the direction in which force is being applied. I did it three times and had abort at all three moments at around 1860 Hz (My test range is 0 - 2000 Hz).

Why is it that I am observing a very high amplitude (more than 3g) in Y-direction and not in the Z-direction (which is the direction force is being applied)? I apply 0.4g at the base in vertical direction. Of course there are resonances in the test range, but I cannot understand why is there an observance of large amplitude in longitudinal direction (Y). Can someone shed some light on this, looking at design and test setup? Would be grateful.

Regards
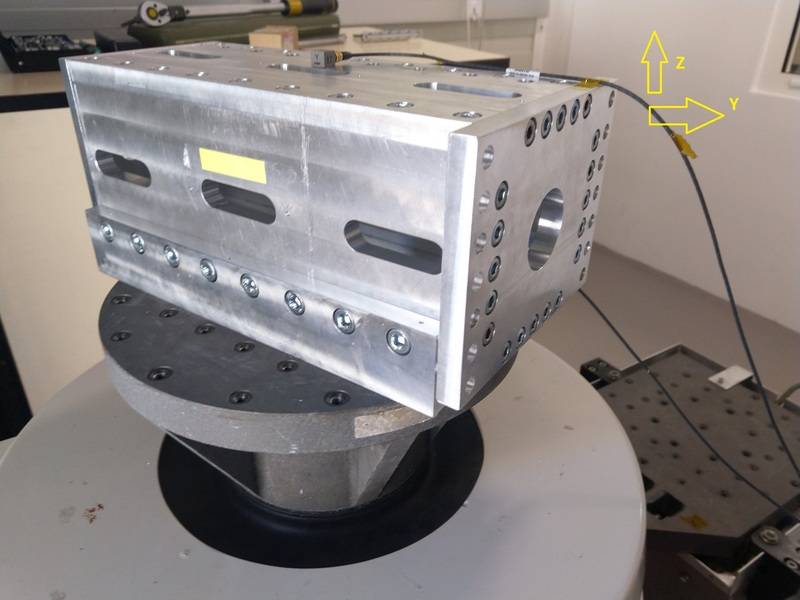
test_zps0jn9quap.jpg
 

Attachments

  • test_zps0jn9quap.jpg
    test_zps0jn9quap.jpg
    42 KB · Views: 817
Engineering news on Phys.org
  • #2
Is the cg of your object on the table located exactly over the center of the actuator?
 
  • #3
JBA said:
Is the cg of your object on the table located exactly over the center of the actuator?

There is a small offset because the two plates at opposite ends are not same in mass. But I do not think that is an issue because I conducted a similar test where this object was rotated 90 degrees about its longitudinal axis, and I did not face any trouble in that test.
 
  • #4
Have you turned it so that the current y direction of your box faces up and validated that the accelerometer is reading correctly? Does the lab have any other vibe plates or cubes that you could try? When you use the strobe light, do you see any racking of the cube?
 
  • Like
Likes CWatters
  • #5
berkeman said:
Have you turned it so that the current y direction of your box faces up and validated that the accelerometer is reading correctly? Does the lab have any other vibe plates or cubes that you could try? When you use the strobe light, do you see any racking of the cube?

Yes I have tested with this box lying vertically on this U shaped plate too. In fact this fixture is supposed to test the specimen inside in all three axis. So 1 vertical and 1 horizontal orientations had no issue. The third one has issues.

Referring to point regarding CG mentioned by JBA, I checked it in the CAD drawing by having a common coordinate system, but apparently the CG in both cases is at same location except for lateral direction (offset of 0.46 mm).
 
  • #6
Do you have access to the strobe light with that fixture? That may give you some clues as to what is going on...
 
  • #7
BTW, in the picture, I don't see the y-sensor. Is it on the hidden face to the left?
 
  • #8
berkeman said:
BTW, in the picture, I don't see the y-sensor. Is it on the hidden face to the left?

Thanks for the suggestion regarding strobe light. I will try that during next test.

Regarding sensor, the one you see on top is a triaxial sensor. The sensor-Z is in vertial direction, Y points to the longer length of the object and X is hidden, pointing laterally (shorter length).

My understanding regarding shaker tables is that CG is more critical when you use table in horizontal configuration. The fixture you see designed by me tries to avoid having to use the horizontal shaker. The CG deviation from center is probably less critical when you are actuating the test object in vertical direction.
 
  • #9
If there was no lateral accelerations measured in the x or y during the the test with the rotated object that would seem to imply some interaction of the offset cg with the shaker in the y direction. Using the strobe may reveal if there is any y movement in the shaker that would indicate it is not tightly restrained in that direction. If so, your cg offset could result in the whole actuator assembly mass oscillating in the y plane.
 
  • #10
Have you tested Z versus Y on the shaker table with no test POD?

My thought was to isolate whether it is the table or the POD that contributes the Y component.

The table or whatever holds the shaker might itself be shaking.
 
  • Like
Likes berkeman
  • #11
Could it be something like the sensitivity of the accelerometer being different in different axis? Gain setting in the scope or data logger?
 
  • #12
CWatters said:
Could it be something like the sensitivity of the accelerometer being different in different axis? Gain setting in the scope or data logger?

Normally the gain is adjusted before starting the test. The measurement system conducts a "self check" and reports any deviation. So I do not think it is an issue. Maybe if I was performing the test following another test, it could be but I started test without any thing performed before it.
 
  • #13
I am not trying to be insulting, but is there any chance that you misunderstand the axis of the accelerometers? If you attach the accelerometer flat on a surface, does it measure acceleration parallel to the surface or normal to the surface?
 
  • #14
anorlunda said:
I am not trying to be insulting, but is there any chance that you misunderstand the axis of the accelerometers? If you attach the accelerometer flat on a surface, does it measure acceleration parallel to the surface or normal to the surface?

Since it is a triaxial sensor, it can measure in all three directions. Each output is one "channel". I get movements/spikes on all three channels
 
  • #15
FAlonso said:
Since it is a triaxial sensor, it can measure in all three directions. Each output is one "channel". I get movements/spikes on all three channels

In that case, it is even easier to make a mistake. Might you have reversed interpretations of which is Z and which is Y?
 
  • #16
Can the sensor be mounted on the shaker plate (with the test box in place) and see if you also see the Y accel there? Might give some credence to the offset COG causing multi axis g's.
 
  • #17
Dear all,

Thanks a lot for your valuable inputs. I finally found the problem. It has nothing to do with COG at all. As per documents of similar hardware, COG can be offset by upto 20mm, and in my case it was 10.5 mm.

The issue was the control sensor location. It was apparently too high on the U plate. The vertical sections of U experience higher movement at a mode near 1800 Hz. I just moved the sensor few mm below and no further alarms.

The key learning here is, sensor location is extremely important. For control sensor, try to put it as low as possible.
 
  • Like
Likes Asymptotic, berkeman and anorlunda

FAQ: Vibration testing on shaker - High amplitude observed

What is vibration testing on a shaker?

Vibration testing on a shaker is a type of mechanical testing that involves applying controlled levels of vibration to a test specimen or product in order to evaluate its durability, performance, and reliability. This method is commonly used in industries such as aerospace, automotive, and electronics to simulate real-world conditions and identify potential weaknesses or failures.

Why is high amplitude observed during vibration testing on a shaker?

High amplitude is often observed during vibration testing on a shaker because it is necessary to test the specimen at extreme levels in order to accurately assess its endurance and ability to withstand harsh environments. This allows for the detection of potential issues or weaknesses that may not be apparent at lower levels of vibration.

What types of specimens or products are typically subjected to vibration testing on a shaker?

Vibration testing on a shaker can be used on a wide range of specimens or products, including components such as electronic devices, engines, and structural materials. It is also commonly used to test entire systems or products, such as vehicles, aircraft, and machinery.

What are the benefits of vibration testing on a shaker?

Vibration testing on a shaker has several benefits, including the ability to identify potential design flaws or weaknesses in products, improve product performance and durability, and ensure compliance with industry standards and regulations. It can also save time and costs by identifying issues early on in the product development process.

What are some common standards for vibration testing on a shaker?

There are several commonly used standards for vibration testing on a shaker, including ASTM D3580 for random vibration testing, ASTM D4728 for sinusoidal vibration testing, and MIL-STD-810 for military applications. These standards provide guidelines for test procedures, equipment, and data analysis to ensure consistent and reliable results.

Back
Top