SolidWorks FEA results questioned - torque on cylinder

AI Thread Summary
The discussion centers on the results of a SolidWorks FEA simulation of a solid cylinder subjected to torque, which shows a 0.1 mm increase in diameter and a conic-like deformation. Participants clarify that this apparent deformation is likely an artifact of graphical scaling and the limitations of small displacement theory used in the analysis. They suggest that the results are acceptable as long as the stresses remain within the material's elastic limit, and emphasize the importance of proper modeling and assumptions in FEA. It is noted that for more accurate results, a large displacement analysis or different software like Nastran or Abaqus may be needed. Overall, the concerns about the simulation results are addressed, reassuring that minor discrepancies are not uncommon in FEA.
kazi
Messages
2
Reaction score
0
Hi everyone,

I have a 100 mm long, solid cylinder (shaft) with a diameter of 20 mm. The base circular surface at one end is fixed and the other end gets a torque of 100Nm.

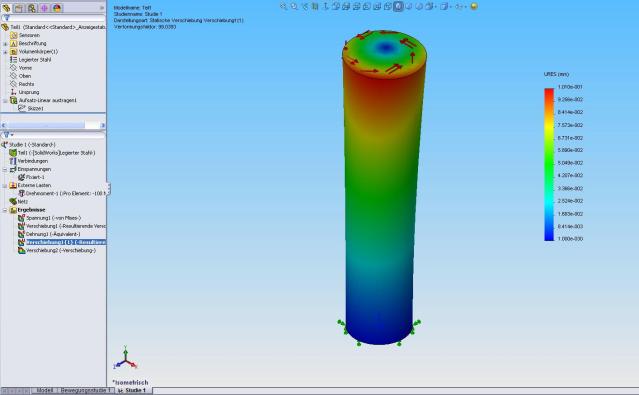
The SolidWorks simulator (URES) results show that the diameter of this shaft increases by about 0.1 mm due to the applied torque. Similar is the outcome using Autodesk Inventor simulation. My cylinder becomes somewhat conic-like in shape, also not completely simmetrical along its original axis. So far I have only seen books with theories that begin with the assumption that the shaft cross section does not change in diameter.

Could these results be false? Can you people tell me how to get the same results on paper? Name a book that explains these results?
1z48yts.jpg
 
Last edited:
Engineering news on Phys.org
This is an artefacct of the way the graphics are drawn.

The FE analysis uses small displacement theory, so the results say the displacement of every point on the cylinder is in the tangential direction. That is a good approximation, so long as the deflections are small.

But when you scale up the displacements to make them visible on a plot, it looks like the radius of the cylinder increases.

If this bothers you (or you don't want to put a misleading picture in a report) just plot the stresses on the undeformed structure.

You could fix the problem by doing a large displacement analysis (if that is available in solidworks - I don't use it) which would give the "correct" displacements for an arbitrary rotation (i.e. if you modeled a long cylinder and the torque twisted it through 360 degrees, the displacements at the end would be calculated as zero!). But you can only plot the results of a large displacement analysis correctly at "actual size", not scaled up to make them visible.

If the stresses in your model are sensible (e.g. within the elastic limit of the material) the results from the small displacement analysis will be OK in practice, even if the graphics look strange.
 
I agree with Aleph, it's probably the graphics on how it's drawn. If that's not the real cause, it's probably due to the mesh size being too large. The equations in finite element theory as formulated such that in the limit as the element size approaches zero, the result becomes more and more accurate. You can't really control the element size too much with COSMOS (or whatever they're calling it nowadays), so your displacements might be off a bit. 0.1mm over a 20mm diameter is 0.5%, so that's not too bad. As well, SolidWorks FEA isn't exactly the most accurate analysis software. It'll get you close, but if you want more exact answers, use Nastran or Abaqus. Also, I think you might be confusing what URES gives you. It will tell you the total displacement of the nodes in those areas, but not necessarily where the nodes are displacing to. I think the 0.1mm is the displacement of the node around the shaft, or in other words the angle of twist times the radius of the shaft.

The main thing you have to keep in mind with FEA is that it only does what you tell it. How you define your constraints, loads, elements, the placement of your nodes, etc. makes certain assumptions. More often than not, it's your fault if it doesn't give you the "right" results because you made some bad assumptions somewhere. I think it's great that you posted this because you're trying to make the results jive with your engineering intuition. It seems more and more people are just blindly trusting results from analysis software and not thinking critically when the results seem counter-intuitive. +1 for that. By the way, a torsion case like in your model doesn't increase the diameter of the rod. You're right about that.
 
Last edited:
Well even without scaling (on the picture it is about 100x) this 0,1 mm deformation is slightly visible. I was a bit worried about the simulation results vs books telling me there is such no deformation. But now that you have explained what is happening I understand this is not to worry about too much.

Thank you for the answer AlephZero
 
Here's a video by “driving 4 answers” who seems to me to be well versed on the details of Internal Combustion engines. The video does cover something that's a bit shrouded in 'conspiracy theory', and he touches on that, but of course for phys.org, I'm only interested in the actual science involved. He analyzes the claim of achieving 100 mpg with a 427 cubic inch V8 1970 Ford Galaxy in 1977. Only the fuel supply system was modified. I was surprised that he feels the claim could have been...
TL;DR Summary: Heard in the news about using sonar to locate the sub Hello : After the sinking of the ship near the Greek shores , carrying of alot of people , there was another accident that include 5 tourists and a submarine visiting the titanic , which went missing Some technical notes captured my attention, that there us few sonar devices are hearing sounds repeated every 30 seconds , but they are not able to locate the source Is it possible that the sound waves are reflecting from...
Back
Top